
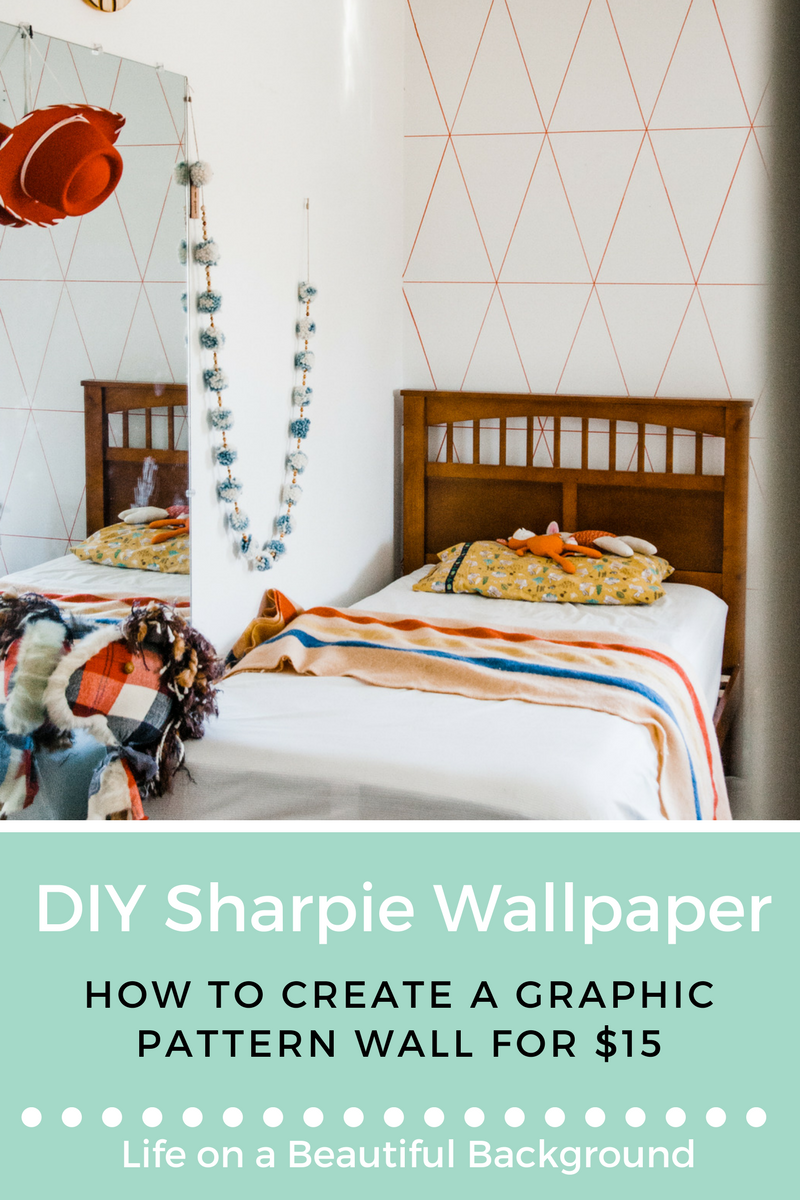
How to DIY Graphic Pattern Wallpaper with Sharpie
/
DIY Feature Wall Ideas for Children's Bedroom
When I found out we were expecting again, I knew the baby would eventually share a room with our three-year-old Caroline since our guest room is often occupied by my in-laws (who kindly provide weekly child care– thanks Palmers!).
With a shared room on the horizon for Caroline, I wanted to make the changes to her room special and exciting. The most exciting update for Caroline was her big girl bed (which we'll go into more in a later post), but the most exciting one for me was a feature wall!
I had my heart set on wallpapering the wall behind the bed and the crib, the wall you see when first entering the room. I looked at alllll the wallpapered kid's rooms on the internet, but held off making a decision until we knew the gender of baby #2.
After we found out we were having a boy (and Caroline stopped crying and insisting the doctor was wrong), I decided on this BEAUTIFUL wallpaper by Hygge & West. However, after purchasing the new big girl bed and mattress, we decided $300+ for wallpaper in the kid's room wasn't in our budget. Plus, to be honest, installing wallpaper still kind of scares me probably because I've never done it before.
Creating DIY Wallpaper with Sharpie Paint Markers
So with wallpaper off the table (and wall, hardy har har), I started searching for ways to create a feature wall with a similar look, but for less. That's when I ran into this blog post and I set my sights on drawing on my daughter's bedroom wall. Of course, while buying the Sharpie paint markers I had to explain to Caroline that only mommy and daddy were allowed to draw on her wall. Talk about confusing a toddler.
The first day we worked on the wall we did boring stuff like patch and paint holes (at my husband's insistence– booooooooring). I guess it's good we do projects like this together so he doesn't become completely discouraged when something isn't perfect and I don't start drawing on walls with absolutely no prep work.
The second day, we actually got to start drawing! This project was so great because it only cost us $15 (for the Sharpies) and required the following tools: levels (we used a 4ft one for drawing horizontal lines and a 2ft one for the diamond patterns), a pencil, three water-based Sharpie paint markers. (Note: We made our pattern the same size as the one from the tutorial– the horizontal lines were 18 inches apart and the triangles had 12 inch bases.)
Most of the time we worked together with Patrick holding the level and me drawing. At certain points, we each did it solo, but it seemed much less stressful and fewer mistakes happened when we worked as a team. While we drew on her wall, Caroline did puzzles, played with a Star Wars Lego space ship, jumped on our backs and watched My Little Pony.


Adding a Graphic Wall Design for $15
Overall, the wall project took us about 5 hours to complete (granted this was probably stretched out because of aforementioned three-year-old) including me going back with a tiny paint brush to touch up mistakes.
The design is definitely not perfect, but I love it. Not only does it add a fun graphic element, but it makes the room feel bigger. And hello, it was only $15 and we can just prime and paint over it when we're ready for something new in fifteen years! Caroline claims to like it too. Now just fingers crossed the baby doesn't hate our design choice.
Oh and PS Caroline's pretty okay about having a baby brother these days.
Note: Be sure to check out the post that I used as a guide for all of the DIY project details!


Before

After


Personal Home Survey
Understand you and your home better!